Good communication is key in any setting; the mountains surely aren’t an exception to this. This blog post will describe what types of communication is necessary in the mountains and describe multiple options of communication devices commonly used in order to establish great group communication, including various types of radios, satellite communication technologies, and other group communication strategies. This blog post is designed to be an overview of these various technologies to give you a starting point to explore each option more thoroughly. Enjoy!
Read MoreTo Hardboot or Not to Hardboot....That is the Question: A quick synopsis of Hardboot Splitboard setups /
Backcountry skiing and snowboarding has grown tremendously in the past 5-10 years. When I started riding in the backcountry 8 years ago, you didn’t have to go very far from ski area boundaries to find untracked, deep snow. The secret is out it seems, and more and more people are getting into the backcountry. The gear has changed with the times, becoming more accessible to everyone by being lighter, more reliable, and cost-effective, making the barrier to entry into backcountry skiing/riding more accessible than its ever been before, which overall is a great thing!
To address this trend of providing easier access, lighter equipment has been on the rise. In the ski industry, companies are doing what they can to reduce the weight of skis, bindings, and boots to make it easier to go further without compromising too much on the downhill performance. I had a great mentor early on in my guiding career that states “everything comes at a cost” and often with this ultra-light gear, this cost is downhill performance. Much of the same tech has been developed for splitboarding equipment, and will be discussed below.
What is a hard boot splitboard setup?
Traditionally, most splitboard setups were hard boot setups. These setups grew as a result of a competition setting, where folks would utilize stiff plastic boots that connected to a plate which was mounted on the surface of the board. The advantage here was that with stiff boots and bindings, edge response was quick and highly responsive. As snowboarding took on a more freeride approach, the focus came into utilizing a board’s flexion and playfulness to do tricks and surf in powder. To meet this need, boots and bindings took on a softer character as well, allowing a rider to experience much more playfulness and flexion within their board. This setup now has become the modern standard as many riders still aim to focus on playfulness over responsiveness with their setups.

Example of soft boot snowboard boots and strap-in bindings. Photo courtesy of Tahoe Dave’s (https://rentals.tahoedaves.com/rent/snowboard-boots-bindings-only).
Hard boot setups on the other hand utilize ski mountaineering randonee race boots with “tech style” (pin binding) inserts coupled with a tech style toe piece and ride-mode plates for the downhill. Two companies currently sell the equipment for hard boot setups: Phantom Snow Industries (http://www.phantomsnow.com/) and Spark R&D (https://www.sparkrandd.com/), both of which focus specifically on splitboading gear development. Further down in this post, I’ll discuss my preferred advantages to each of these companies’ systems, as no one company does hard boot setups better than another; it very much depends on how and where you plan to apply each system.
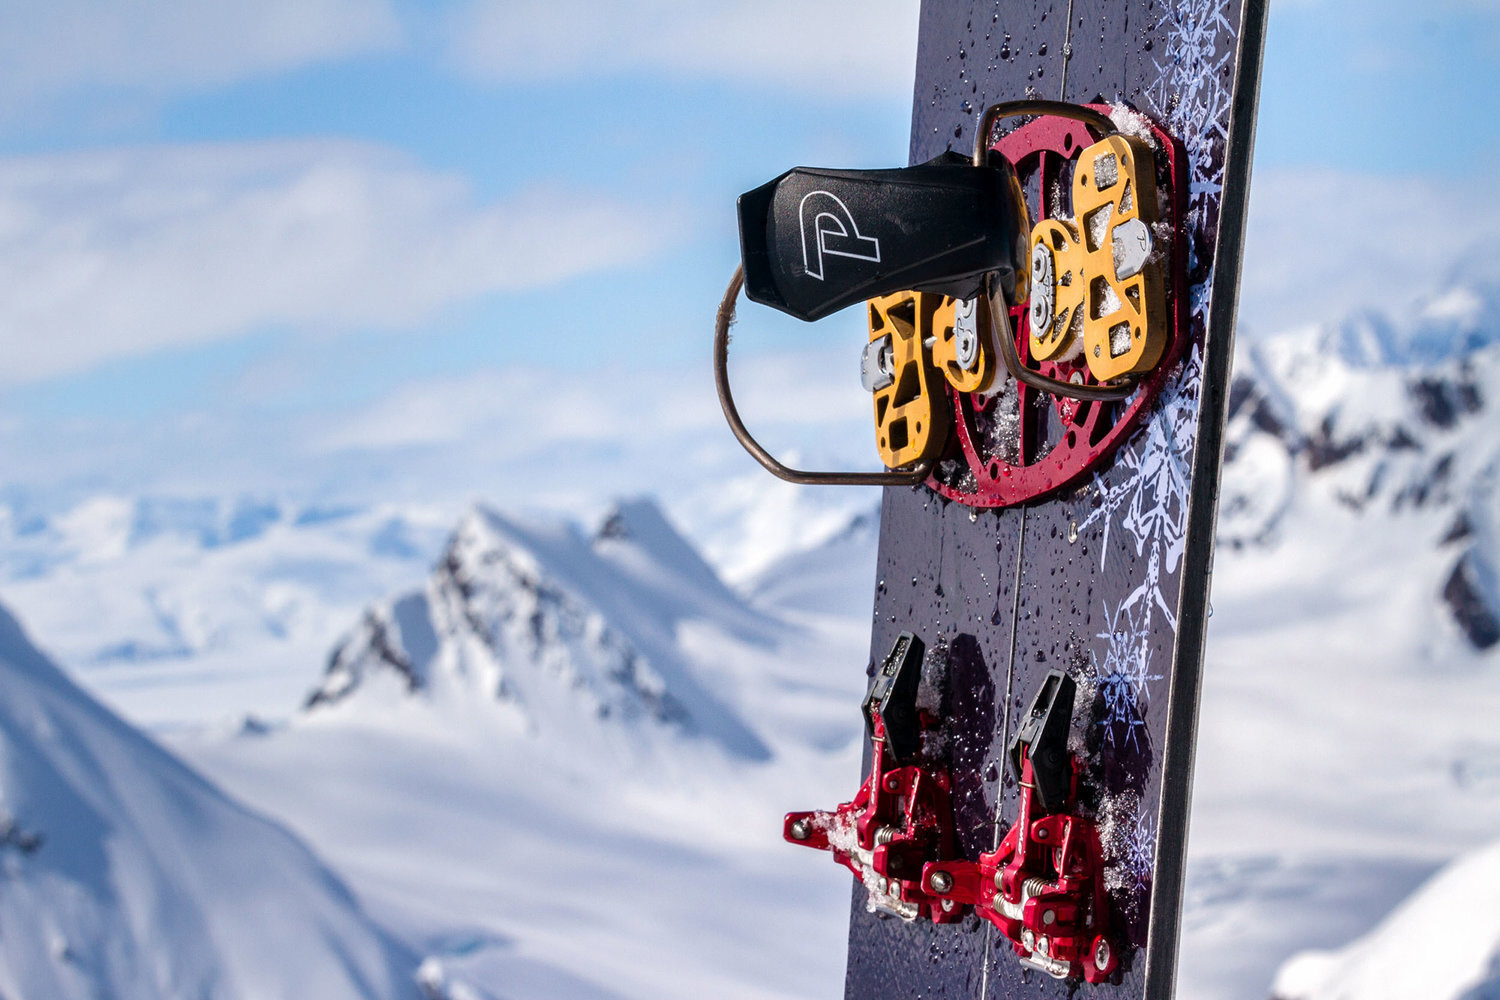
Example of a hard boot splitboard setup, with tech-style toe pieces and ride-mode plates. Photo courtesy of Phantom Snow Industries (http://www.phantomsnow.com/).
Why consider a hard boot setup?
As I mentioned above, the advantage that hard boots have are many, but it depends highly on what style of riding you hope to do in the backcountry. If your goal is to hike less than 1,000-1,500 vertical feet outside of the boundary to session a jump that you’ve built to do freeride tricks, then hard boots would not be as useful to you. Listed below are the primary advantages for hard boots over soft boots:
Significantly lower weight underfoot
Torsional stiffness provided by a ski boot provides significantly greater stability on a skin track, especially if the track involves significant side hilling and/or “scribing” on hardpack/icey conditions
When in a ski mountaineering context, it’s far easier to get a stiff attachment of an automatic crampon on a ski boot compared to even more “ski mountaineering-specific” soft boots
Kicking steps up firm snow is easier than with a snowboard boot since a ski boot is profiled differently than a snowboard boot
Significantly easier split skiing ability since the boot provides much higher torsional stiffness
Significantly higher edge responsiveness due to stiffer boot in general
Because torsional stiffness is provided by a boot rather than a binding, there is less strain on the binding itself, causing binding screws to receive less force and generally be less likely to fall out
As you can start to glean, many of the advantages that a hard boot setup provide focus on uphill performance compared to downhill performance. This is the limitation of a hard boot setup in general: mimicking the same playfulness provided by a soft boot is challenging with a stiffer boot. I’ll discuss below in the “Gear Options and Modifications” section what kind of tech has been developed to adjust to this concern.
In my opinion however, for most of my riding, I prefer this high degree of responsiveness and less playful feel. I like to focus on steep, ski mountaineering-style lines, where having reliable edge control and responsiveness is key. If you too aim to focus more on riding steeps comfortably, going as fast as possible on the uphill and are okay with doing fewer freestyle tricks, you’ll definitely appreciate the benefits offered by hard boots.

If you’d like to take your splitboarding into the big mountains where there may be technical approaches and descents, a hard boot system makes the most sense. Here is a photo of me ice climbing the North Ridge of Mt. Baker in hard boots with my splitboard on my backpack. Hard boots are the gear of choice here as they are much more compatible with an automatic, ice-climbing crampon. Photo courtesy Matteo Agnoloni.
Gear Options and Modification
As I listed above, two companies primarily produce equipment for hard boot setups: Spark R&D (https://www.sparkrandd.com/) and Phantom Snow Industries (http://www.phantomsnow.com/). I’ve used both setups in multiple different snowpack climates (dry vs. cold snow), and each offer advantages for specific purposes. Check out my compare/contrast below for a comparison of hard boot setups. **Quick sidenote: I’m not sponsored by either of these brands, so I’m doing my best to describe my own experience-based, objective opinion as much as possible. Of course, you as an independent consumer can choose based on your own needs**:
Spark R&D:
The setup:
Dyno DH Plates w/ Spark Canted Pucks (ride mode)
Either Spark Tech Toes OR Dynafit Speed Radical Toe Pieces + Dynafit Toe Adapter Plates
Advantages:
Easy to clear canted pucks when balled up with snow (especially useful if you ride in environments with heavy, wet snow, such as the PNW, SW Coast Range of BC, New Zealand, etc)
Slightly cheaper than Phantom setup
Larger company than Phantom, so orders are processed quickly
Disadvantages:
Heavier than the Phantom setup
Because plates are mounted on pucks, the bottom of your boot is higher from the base of the board compared to the Phantom plates, making it slightly less responsive
Tech is being developed at a slower rate when compared to Phantom setup

Example of the Spark R&D Dyno DH ride-mode plates and the Dynafit Speed Radical toe pieces + Dynafit Toe Adapter Plates. Photo courtesy: Earn Your Turns (https://earnyourturns.com/31632/first-look-spark-rd-dyno-hardboot-binding/).
Phantom Interface:
The setup:
3-in-1 cleats OR Split Cleats (depending on your model of splitboard) + M6 Bindings (ride mode)
Either Phantom Tech Toes OR Dynafit Speed Radical Toe Pieces + Dynafit Toe Adapter Plates
Advantages:
By and large the lightest, most reliable hard boot splitboard setup on the market
Because M6 bindings mount around the cleats, the profile of your boot sole is much closer to your edge, providing high edge responsiveness
Phantom is the industry leader at revolutionizing new hard boot tech, where they have developed both boot modifications for the Atomic Backland boot, as well as Verts compatible with their M6 binding interface
Disadvantages:
Higher price point compared to Spark R&D plates and pucks
More difficult to clear balled snow in a maritime snowpack climate (where snow is heavy, wet, and has a high moisture content)
Smaller company than Spark, hence orders can take longer to be processed when compared to other larger companies

Example of the Phantom setup set to ride mode, with Dynafit TLT 6 boots clipped ready to ride. Photo courtesy: Selkirk Mountain Experience (http://www.selkirkexperience.com/book_gear.html).
Boot Options and Modifications
In general, a good boot for hard boot splitboarding is one with the following characteristics:
As light as possible
Has high lateral flex in walk mode
Has minimal buckles to promote high boot flexion and increase speed
Has a beefy and reliable toe and heel welts
Includes tech (pin binding) inserts in the toes
Phantom has a much more detailed writeup of boots specifically, so I’d reccomend you check out their discussion here if you’re interested: http://www.phantomsnow.com/system/boots.
Of note, Karakoram makes a soft boot splitboarding binding with a feature called the FlexLock system (http://www.splitboardmag.com/karakoram-introduces-the-flex-lock/), which provides more torsional stability than an average soft boot system. If you are thinking to upgrade to a hard boot setup based only on the boot’s torsional stiffness on the skin track, I would reccomend this binding choice and staying with soft boots. However, if you aim to utilize the additional advantages offered by hard boots beyond this feature, I would still consider moving to a hard boot setup.
Summary
As you can see, there are many options for boots, bindings, and interfaces depending on where you plan to take your riding. Ultimately like most gear in the mountains, the best gear is the most reliable gear and the ones that you know how to use. I suggest if you do transition to hard boots, start small on the objectives you use it with to get a feel for the differences. Ride your splitboard in resort a bit to get lots of downhill mile-age on it and notice the differences in responsiveness. Once it starts to feel comfortable to you then will it be appropriate to take it out on the steeps.
As with everything in life, this blog post and much of my beta changes over time with new information. If you have suggestions for future blog posts, additions to this post, or simply want to message me for any reason, feel free to visit the “Contact Us” section of my website and shoot me a message, or comment below! Any and all feedback is appreciated; thanks!